Sunday, January 12, 2014

Jake’s 3rd Birthday Party

I hope everyone had a wonderful time over the holidays. Christmas and the New Year always come and go by so quickly. Jake’s birthday is in the beginning of January, so that also adds another event to the mix. Jake absolutely loves cars, trucks, trains (basically anything that moves!) so I decided to throw a “Cars" party for him this year.
Jake’s Party Invitation

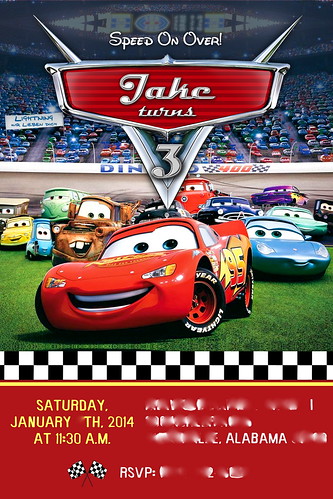
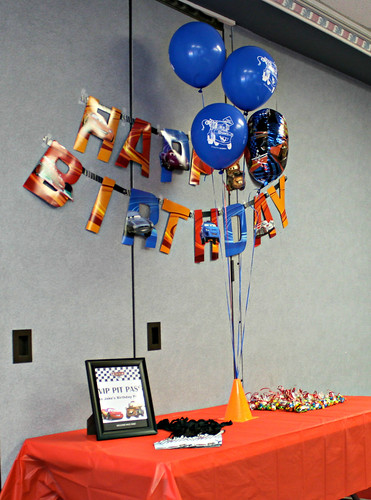
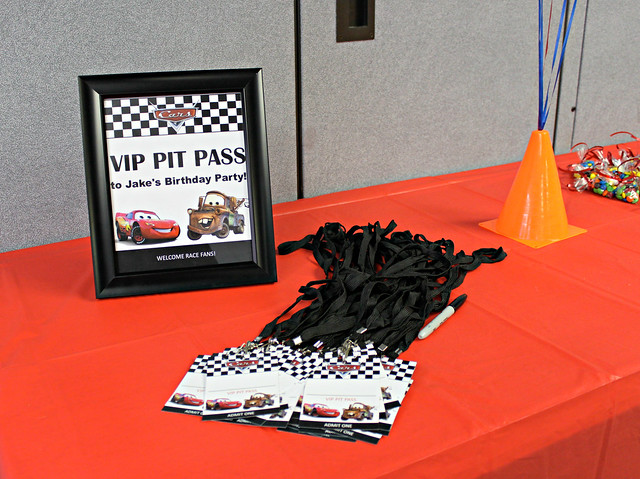
When guests first arrived, there were VIP pit passes for everyone.


Entrance table
Welcome sign and pit pass name tags
Pit Pass name tags

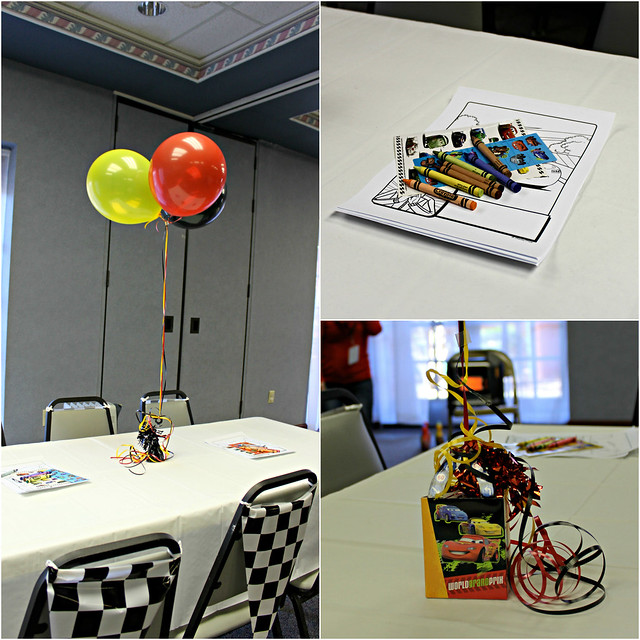
The tables had a small balloon bouquet on each one (I forgot to move the clip down on the balloon bouquet before I took the picture). For the kids, there were several different sheets of cars stickers, cars coloring sheets, and crayons on each table.


Table collage

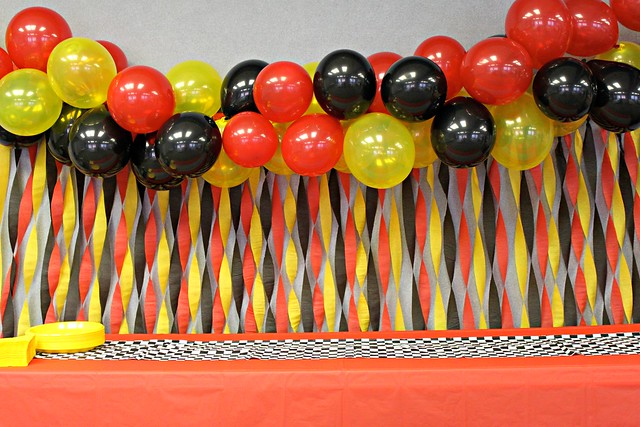
I originally planned to make food for the party, but instead decided to make things easy and order pizza from our favorite pizza place. Here is the back drop and table that the pizza was served on (the tablecloths were red, they just look orange in the photos):

Back-drop for the food table

Next to the food table was the drink and dessert table. We had sweet and unsweet tea as well as water. I also ordered cupcakes from Publix (love their baked goods!) and added sprinkles that I purchased from Bake it Pretty.

Drink and Cupcake table
Cupcakes

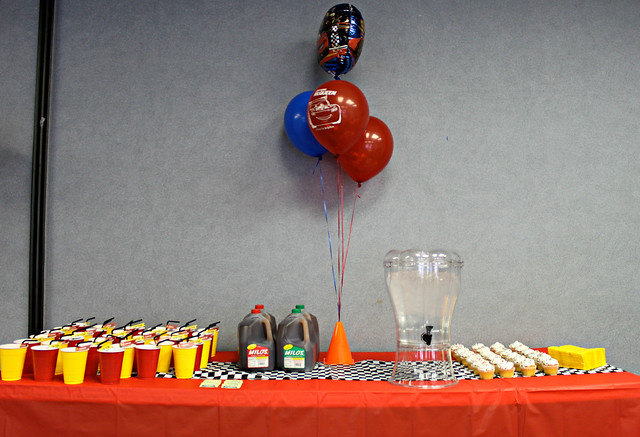
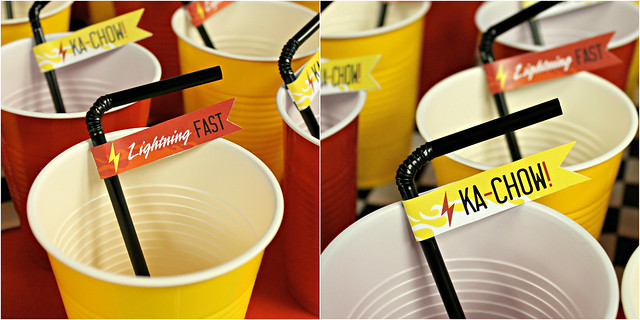
Continuing with the red, black, and yellow color scheme, I bought red and yellow cups and used black plastic straws. I wasn’t able to get a picture of the back of the flags but they were black and white checkered.

Cup flags

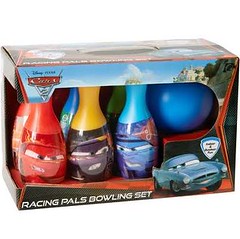
I also wasn’t able to get a picture of it at the party, but we had two small Cars bowling sets for the kids to play with. They had a blast playing with them. 
Cars bowling set
Every year I say I am going to make sure and get some good pictures of everything set-up before the guests arrive, and every year I wish I had taken more. Overall the party went really well! Jake had a great time celebrating his birthday with everyone! He was on the go all day, so it was difficult to get any pictures of him but here is one of the birthday boy:
IMG_3423

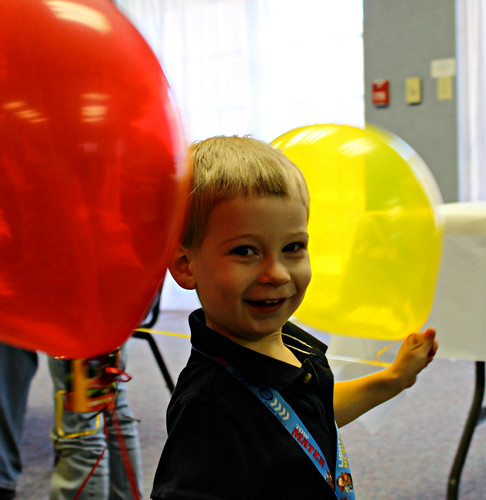
Hard to believe he is already 3!


Invitation: Splashbox Printables

Welcome sign and pit passes: All Things G&D
Checkered Flags tied to the back of each chair.
Flags on the straws: Hostess With the Mostess

Sign-up to receive e-mail updates from Southern Pink Lemonade

Thursday, December 19, 2013

Some of my favorite cookbooks...

Although I get a lot of the recipes that I make from other food blogs, there is nothing quite like flipping through a cookbook to look at all of the wonderful recipes and photos. Christmas will be here before we know it, so I thought I would share a few of my favorite cookbooks. Some of these selections are a few years old, and some just released, but they are all great cookbooks to own or give as a gift! 

Pasta Revolution

Pasta Revolution from America’s Test Kitchen: You really cannot go wrong with America’s Test Kitchen. As soon and I received this cookbook in the mail I could not stop bookmarking recipes to try. If you love pasta, or know someone who does, this is the cookbook to get. It has something for everybody:  Skillet Ziti, Skillet-Baked Tex-Mex Macaroni, Vietnamese Rice Noodle Salad with Pork, several different tomato sauces, pasta salads, and so much more. Really this cookbook has it all--you won’t be disappointed.

How to cook everything

How to Cook Everything: The Basics by Mark Bittman: I bought this cookbook last year for Russell for Christmas. Russell expressed an interest in learning how to cook, and after several people recommended this cookbook I decided to order it for him. It is a great cookbook for beginners, but I also think it is a great reference book for any kitchen. It includes just about everything and features several photos with each recipe for guidance. In fact, it has more than 1,000 photos in the book! I don’t know about you, but I love seeing photos with each recipe (food blogs have really spoiled me in this respect). 

The Williams Sonoma Baking Book

The Williams-Sonoma: Baking Book: This cookbook includes all things baking. This is another cookbook that when I flip through it, I just want to make everything! From cookies to cakes, pies and tarts, etc. If it’s baked, it is probably in this cookbook. This is a great cookbook to have on hand if you are looking for trustworthy recipes.


Geometry of pasta

The Geometry of Pasta by Caz Hildebrand and Jacob Kenedy: I just received this cookbook and haven’t actually made anything from it yet which probably has you wondering why I am including it with my favorite cookbooks already. Although I haven’t made anything from it yet, it has been a great reference book for explaining the many, many different types of pasta, their history, and it includes recipes for each type. Russell and I both love pasta so I have really enjoyed reading about the different types of pasta and their history. This cookbook doesn’t have photos besides the black and white depictions of each type of pasta and yet I didn’t find myself missing the photos unlike when I normally wish cookbooks have more photos.

Untitled

From Our Grandmothers’ Kitchens: This is another cookbook from America’s Test Kitchen, Cook’s Country. I have really enjoyed this cookbook. Readers were asked to send in family recipes along with the stories behind them to Cook’s Country. Cook’s Country then sorted, tasted, and compiled a cookbook from all that were submitted. I have really enjoyed this cookbook and reading the stories behind the recipes is a great compliment to the food. I have at least 10 recipes (if not more!) bookmarked to try. 

Cookbooks on my Christmas list this year:

Baking Book

Cook’s Illustrated: Baking Book: Are you noticing a trend here? Cook’s Illustrated is behind some of the best cookbooks around and I suspect this one is no different. Focused solely on baking, I hope to add this cookbook to my bookshelf soon!

Slow Cooker Revolution 2

Slow-Cooker Revolution Volume 2: Trying to prepare dinner with two babies and a toddler can be hectic. The idea of prepping dinner in the slow-cooker early in the day and having food ready for dinnertime sounds wonderful to me! I also love that this cookbook contains more than the traditional slow-cooker recipes with entries such as spice-rubbed roast chicken, flour-less chocolate cake, and cheesecake. 

Sign-up to receive e-mail updates from Southern Pink Lemonade

Thursday, December 12, 2013

Chocolate Caramel Oatmeal Chewies

Chocolate-Caramel Oatmeal Chewies
During this time of the year sweet treats are everywhere you turn and my sweet tooth loves it :). If you are looking for something to bring to a get-together or party then a  combination of chocolate and caramel is one you can’t go wrong with. The gooey caramel, the chewy oatmeal, and delicious chocolate makes you go back for another piece. The recipe calls for 2 cups of chocolate chips, but I think it could have been better with just 1 1/2 cups. However, everyone else thought they were great the way they were! With that in mind, the recipe below suggests you use between 1 1/2 -2 cups, depending on your taste. 

Chocolate-Caramel Oatmeal Chewies

Chocolate Caramel Oatmeal Chewies

Printer-Friendly Version

Ingredients:
  • 1 3/4 cups old-fashioned or quick oats
  • 1 3/4 cups all-purpose flour, divided
  • 3/4 cup packed brown sugar
  • 1/2 teaspoon baking soda
  • 1/4 teaspoon salt 
  • 3/4 cup (1 1/2 sticks) unsalted butter, melted
  • 1 1/2- 2 cups semi-sweet chocolate chips
  • 1 cup chopped nuts (optional)
  • 1 cup caramel topping
Directions:
Preheat oven to 350 degrees F. Line a 9x13 baking dish with parchment paper.

In a medium bowl, combine oats, 1 1/2 cups flour, brown sugar, baking soda, and salt. Stir in butter and mix until combined. Reserve 1 cup of the oat mixture in a small bowl. Press the remaining oat mixture in the bottom of the lined 9x13 baking dish.

Bake until golden brown, approximately 12-15 minutes. Sprinkle with chocolate chips and nuts. In a small bowl, mix caramel and remaining 1/4 cup flour. Drizzle caramel over chocolate chips to within 1/4 inch of the edges of the pan. Sprinkle with the reserved oat mixture.

Bake for 18-22 minutes or until the top is golden brown. Cool in pan on a wire rack for about an hour and then place in the refrigerator to allow for easier cutting.

Source: Nestle Best Loved Recipes, page 19

Sign-up to receive e-mail updates from Southern Pink Lemonade

Thursday, December 05, 2013

Chocolate Crinkle Cookies

Chocolate Crinkle Cookies

With Thanksgiving being so late this year it is hard to believe it’s already December! Luckily, Russell and I started our Christmas shopping a couple months ago and I ordered our Christmas cards on Monday. We also put up our Christmas tree earlier this week so I don’t feel too far behind, but I know Christmas will be here before I know it! I’m so excited to be living in Alabama this year. It’s such a wonderful feeling knowing that we won’t have to travel during the holidays.

Chocolate Crinkle Cookies
One area I do feel behind on is Christmas baking. I am hoping to try a few new recipes in the next couple of weeks. Now that we live near both of our families I love baking even more because I have so many people to share Christmas goodies with! :)

I actually made these cookies last year for a cookie swap, but I will definitely be making them again this year! I needed 6 dozen cookies for the cookie swap so I doubled the recipe and used a small cookie scoop for this batch.

Chocolate Crinkle Cookies

Printer-Friendly Version

Ingredients:
  • 1 2/3 cups all-purpose flour
  • 1/2 cup unsweetened cocoa powder
  • 1 1/2 teaspoons baking powder
  • 1/4 teaspoon salt
  • 8 Tablespoons (1 stick) unsalted butter, at room temperature
  • 1 1/4 cups white sugar
  • 2 eggs
  • 1/2 teaspoon vanilla extract
  • 1/2 cup powdered sugar
Directions:

Preheat oven to 350 degrees F. Line two cookie sheets with parchment paper.

In a medium bowl, whisk together flour, cocoa powder, baking powder, and salt until well combined.


In a large bowl, beat the butter and sugar together on medium speed for about 3 minutes until nice and creamy. Add 1 egg and beat on medium speed until well combined. Add the second egg and vanilla extract. Beat on medium speed again until well combined.


Add the flour mixture to the butter mixture and beat on low until just combined. Using a tablespoon cookie scoop (can use smaller cookie scoop, just decrease baking time by a few minutes), scoop up a ball of dough. Roll dough in your hands to create a ball. Roll the dough in the powdered sugar until completely covered and place on the cookie sheet. Repeat with the remaining dough, placing the balls 2 inches apart.


Bake for 10-12 minutes or until they are cracked and puffed. Remove cookie sheet from the oven and allow to cool on a wire rack for 15 minutes before moving the cookies to a wire rack to cool completely.


Source: Williams-Sonoma

Sign-up to receive e-mail updates from Southern Pink Lemonade

Monday, November 25, 2013

Cranberry Buttermilk Muffins

IMG_992211U-2

 I didn’t realize until a couple of years ago just how much I loved fresh cranberries (vs. dried). I shared a few recipes last year that used whole cranberries: cranberry-lemon squares and cranberry-orange scones.  I also intended to share a recipe for cranberry-orange muffins but time got away from me. As soon as I came across this recipe I knew that it would be great! Jake devoured 2 1/2 muffins in one sitting and Russell and I really enjoyed them as well.

IMG_9839111U-2

The flavor combination of cranberries and citrus is undeniably wonderful. The buttermilk in these muffins makes them tender, and they are also bursting with what I can only describe as cranberry goodness! Below, the recipe calls for orange zest and orange juice but substituting lemon would work as well. If you are looking for a great breakfast to start your Thanksgiving day--look no further. These muffins are easy to put together and will be sure to power you through all of your Thanksgiving cooking. I hope you enjoy them as much as we did!

Cranberry Buttermilk Muffins

Printer-Friendly Version

Ingredients:
  • 1 1/2 cups cranberries, chopped
  • 3/4 cup sugar, divided
  • 3 cups all-purpose flour
  • 3 1/2 teaspoons baking powder
  • 1/4 teaspoon baking soda
  • 1/2 teaspoon salt
  • 1/2 cup unsalted butter, cold and cut into cubes
  • 1 1/2 cups buttermilk, room temperature
  • 1 egg
  • 1 Tablespoon orange zest
  • 2 Tablespoons orange juice
Directions:
Preheat oven to 375 degrees F. Line 24 muffin cups with muffin liners.

In a small bowl combine chopped cranberries and 1/4 cup sugar, set aside.

In the bowl of a food processor pulse flour, remaining sugar, baking powder, baking soda, and salt until combined. Add cubed butter and pulse until mixture resembles coarse crumbs and transfer to a large bowl. Alternately, you can use a pastry cutter to cut butter into flour mixture.

In a small bowl, whisk together buttermilk, egg, orange zest, and orange juice.

Add the buttermilk mixture to the flour mixture and stir until just combined. Gently fold in the sugared cranberries.

Fill muffin tins 3/4 full and bake for 20-25 minutes or until toothpick comes out with only a few moist crumbs. Cool on wire rack. 

Slightly adapted from: Good Thymes and Good Food, originally adapted from Food.com

Sign-up to receive e-mail updates from Southern Pink Lemonade

Tuesday, November 19, 2013

Brown Sugar Pecan Pie + an Update

Brown Sugar Pecan Pie

I know it has been several months since I have shared anything so here is a quick update on what has been going on in the Southern Pink Lemonade household…

Back in February Russell and I found out that we were not only adding to our family, but we were having twins! :) We never in a million years thought we would be having twins, so we were quite surprised by the news. Once we found out that we were having twins we started making arrangements to move back to Alabama before the babies were born. We moved to Alabama in May and had just a couple of short months before the girls were born in July. 


Natalie and Ella were born a few weeks early so they had to spend a little less than two weeks in the NICU (mostly just to gain weight and learn how to eat). They came home in early August and we have been adjusting to life with 2 newborns/infants pretty well if I do say so myself :) . Jake is such a loving big brother and really enjoys having two babies in the house. The girls are not quite 4 months old and I have been slowly trying to get back into the kitchen. 


Brown Sugar Pecan Pie

I came across a recipe for brown sugar pie in Cook’s Country: From Our Grandmothers’ Kitchens cookbook. With a relatively quick baking time and short ingredient list I decided to give it a try. While it was quite tasty, I felt like it was missing something. The pie itself reminded me of the filling in pecan pies so I decided to make a second attempt while adding pecans. I knew after the first bite that I had a winner!


Brown Sugar Pecan Pie

This pie is basically a pecan pie without using corn syrup, which is found in most pecan pies. I decided to mix the pecans in with the filling instead of placing them on the bottom and then pouring the filling over it like most pecan pie recipes recommend. I really enjoyed the pecan pieces being incorporated throughout the entire pie. I used a pre-made pie crust to save on time but feel free to use your favorite pie crust recipe.


Brown Sugar Pecan Pie

Printer-Friendly Version

Ingredients:

  • 2 Tablespoons butter
  • 1 cup + 2 Tablespoons packed light brown sugar
  • 4 1/2 teaspoons all-purpose flour
  • 1/8 teaspoon salt
  • 2 eggs
  • 1/4 cup evaporated milk
  • 1 teaspoon vanilla extract
  • 1 cup pecan pieces
  • 1- 9-inch pie crust, chilled and unbaked
Directions:
Preheat oven to 350 degrees F.


In a small saucepan, melt butter over medium heat until butter is slightly browned and has a nutty aroma to it, about 3 minutes. Set aside to cool.


In a medium bowl add brown sugar making sure to break up any clumps. Add cooled butter and combine until butter is evenly distributed. Mix in flour and salt.


In a small bowl, whisk together eggs, milk, and vanilla extract. Add the egg mixture to the sugar mixture and whisk to combine. Stir in pecans.


Pour mixture into pie crust. Bake for 35-40 minutes or until toothpick inserted in the middle comes out with a few wet crumbs.


Remove pie from the oven and place on a wire rack. Allow to cool for 2 hours before serving.


Adapted from: Cook’s Country: From Our Grandmothers' Kitchens, page 164-165 Recipe submitted to Cook’s Country by: Audrey Hunter of Tennessee


Sign-up to receive e-mail updates from Southern Pink Lemonade
Back to Top